How to Customize Patient Education Handouts (2026)
Learn how to customize patient education handouts for your clinic brand. Edit content by specialty and add your logo in minutes. Free templates included.
A front desk coordinator at a physical therapy clinic noticed something odd during a routine audit. About half the patient education handouts given out that month weren't branded with the clinic's name. No logo. No phone number. No way for a patient to connect the sheet to the practice that issued it. Patients kept calling back for answers the handout was supposed to provide. They just didn't realize they had it.
Unbranded patient education handouts waste the investment your staff made in printing and giving them. Research published by the National Institutes of Health found that patients forget 40 to 80% of clinical information before they leave the building. A handout is supposed to fill that gap. But if it doesn't carry your clinic's name and number, it becomes just another piece of paper.
This guide covers both types of customization. The first adjusts the clinical content to fit your specific procedures. The second adds your clinic's branding before you print. Both steps take under 10 minutes once you have the right workflow.
Why Generic Patient Education Handouts Don't Work for Your Patients
Most clinics already hand out something. The problem is rarely the absence of a handout. It's the absence of your identity on the handout.
A post-extraction care sheet with your clinic's name, phone number, and logo sends one message: this came from your dentist. Call them if something seems wrong. A sheet with none of those things is a document with no owner. Patients set those aside.
According to Health IT Analytics, 50% of patients forget their treatment plan before they've had a chance to act on it. A branded patient education handout is the fix for that forgetting problem. But only if patients know it belongs to their provider.
Beyond branding, there's a content problem. Generic templates often describe clinical situations your specific patient population doesn't quite recognize. A physical therapy patient recovering from rotator cuff surgery has different warning signs than a patient with chronic lower back pain. When the handout doesn't match the procedure, patients notice. They stop trusting it.
Two Layers of Customization Worth Separating
When clinic staff think about customizing a patient education handout, they usually picture changing the logo and the clinic name. That's part of it. But the more valuable customization often happens in the content itself.
These two layers are worth treating separately because they take different effort and different expertise.
The Content Layer: Making It Specific to Your Patients
Clinical content inside patient education handouts is what patients actually read and act on. The sections most worth reviewing for your specialty:
- Warning signs that reflect what your patient population reports after your specific procedures
- FAQ answers that match the questions your front desk fields most often
- "What to do" steps adjusted to match your post-procedure protocols
- Medication names updated to reflect what your providers actually prescribe
Most clinics don't need to rewrite an entire handout from scratch. Two or three section edits are usually enough to make the material feel specific to your practice. Everything else stays exactly as written.
The Branding Layer: Making It Point Back to You
The branding layer covers your clinic name, logo, phone number, email, and address. It's the layer that turns a generic document into a handout your patients associate with your practice.
The Agency for Healthcare Research and Quality recommends that all patient education materials include clear attribution to the providing organization. That means contact information the patient can use to ask follow-up questions. Patients who can't identify where a document came from are less likely to act on it.
Setting up branding once and having it apply automatically across every handout you download is what saves time long term.
How to Customize Patient Education Handouts on ClinicsFlows
ClinicsFlows separates the two customization layers into a clear workflow. The clinical content is pre-written by specialty and procedure. You adjust what needs adjusting and add your branding. Here's exactly how.
Step 1: Find the Template That Matches Your Procedure
Go to patient handouts and filter by specialty. The library has 2,000+ patient education handouts across 14 specialties. Each specialty page organizes templates by condition and procedure type.
A dental patient education handout for post-root canal recovery is different from a physical therapy handout for post-surgical back pain. Browse within your specialty and open the template that fits your highest-volume procedure.
Step 2: Copy It to Your Clinic Library
Public templates on ClinicsFlows are read-only. To edit the content, click Copy on any template. This creates an editable version saved to your clinic's dashboard. The original stays unchanged.
This copy is yours. You can edit it, save it, and re-download it with updated branding any time without touching the source template.
Step 3: Edit Only the Sections That Need Your Input
Your copied template opens in section-by-section edit mode. Each section is an independent editable field:
- Summary
- What is this condition or procedure
- What to do
- What not to do
- Normal vs. warning signs
- Frequently asked questions
Edit only what your clinic needs to change. ClinicsFlows templates are already written at an 8th-grade reading level, which is the standard the AHRQ recommends for patient education materials. Editing just the sections that require your specific input keeps the handout clinically sound and easy to read.
Step 4: Save Your Clinic Details in Settings
Log in and go to Clinic Settings. Enter your clinic name, logo, phone, email, and address once. Save it. From that point on, every time you open the branding dialog on any handout, those fields auto-populate. You don't retype your phone number every time you download a handout.
Step 5: Download the Branded PDF
Open the branding dialog from any template page. Your clinic details are already filled in. Check the boxes for the fields you want to appear on the PDF, confirm in the live preview on the left, and click Download PDF.
The result is a branded, content-customized patient education handout ready to print or send digitally.
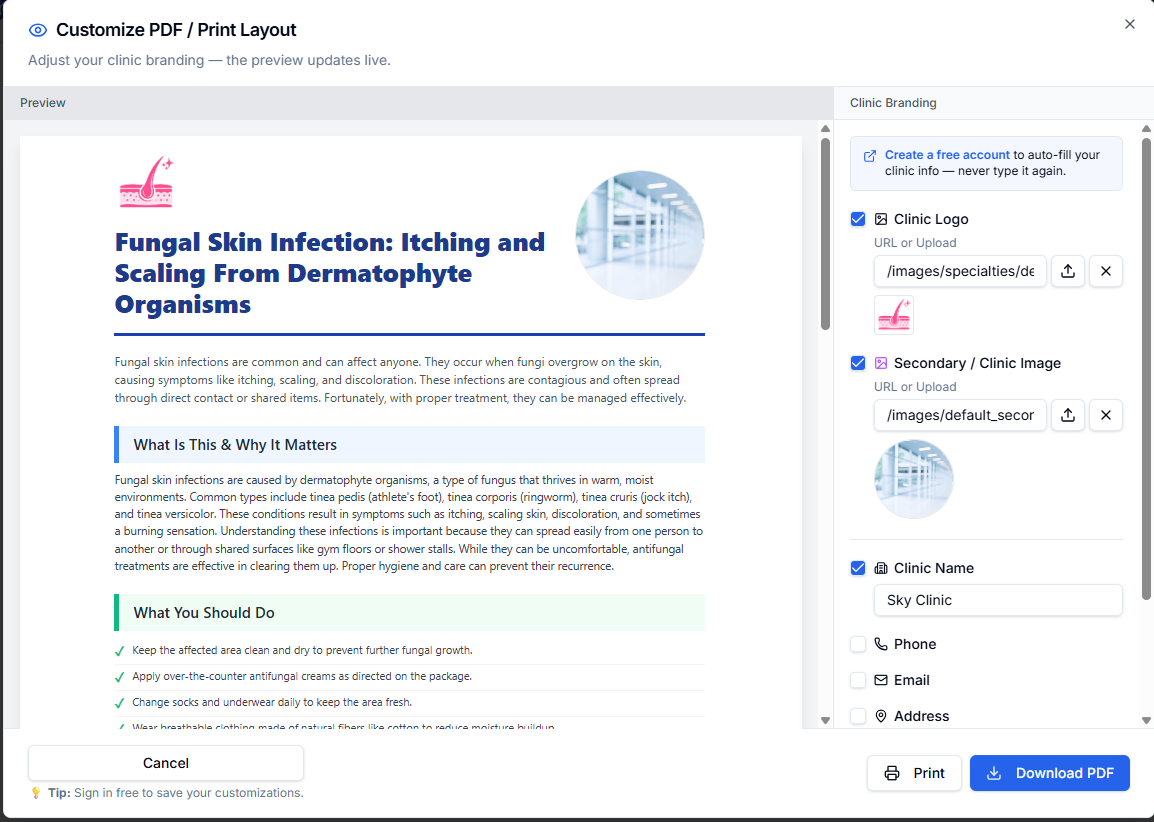
Figure: ClinicsFlows opens in section-by-section edit mode,so clinics can update specific content fields without touching the full template layout.
Which Sections Are Worth Editing
Not every section in a patient education handout needs your input. Here's where clinics typically make targeted edits and where they skip.
Warning Signs. This is the section most likely to need updating. Warning signs vary significantly by procedure and by how your specific patient population presents. If your front desk regularly reassures patients about a particular symptom, that symptom probably needs its own line in your warning signs section.
FAQs. Think of the FAQ section as your front desk's voice on paper. What are the two or three questions your staff answers most often the day after a specific appointment type? Add those questions here, in the language your patients use. Remove questions your patient population never asks.
What to Do and What Not to Do. Surgical and procedure-based practices often need specific edits here. If your post-op protocol differs from standard guidance in any step, this is where that difference should appear in writing.
Summary and What Is This. These sections rarely need changes. They explain the condition or procedure clearly and accurately for most patient populations. Edit these only if you serve patients with specific literacy needs or language differences that require a different explanation style.
How to Build Your Clinic's Handout Library
Customizing one handout gets you one good document. Building a library of customized handouts gives your whole team a resource they can trust and use without help.
A practice manager at a 4-provider orthopedic clinic built one over three weeks. She identified the 12 patient education handouts her front desk reached for most often: post-knee-surgery care, ACL recovery, pre-op prep for hip replacement, and nine others. She copied each template to the clinic's ClinicsFlows account, edited the warning signs and FAQ sections for each, and saved the customized versions. Now anyone on the front desk can log in, search by procedure, and download a branded PDF in under two minutes. No one has to ask where the handouts are.
Three things make a clinic handout library work:
- Start with your highest-callback procedures. The handouts your front desk explains by phone most often are the ones worth customizing first.
- Name saved templates clearly. "Post-Knee-Surgery Recovery" is faster to find than "Orthopedic Handout 4."
- Set a review reminder. Clinical content should be reviewed once a year or whenever your procedures change.

Figure: A saved library of customized handouts means any team member can find and download the right template without asking for help.
Frequently Asked Questions
What is the difference between customizing content and customizing branding on a patient education handout?
Content customization means editing the clinical text inside the handout: warning signs, FAQs, and procedure instructions. Branding customization means adding your clinic name, logo, and phone number to the header and footer. ClinicsFlows handles both. Content editing requires a free account. Branding is available to logged-in users and guests.
Do I need design skills to customize patient education handout templates?
No. Templates are pre-formatted for print. Content edits are plain text fields you type directly into. Branding is added through a form with a live preview so you see exactly how the PDF will look before downloading. No design software is needed at any step.
Can multiple staff members access and use the same customized handouts?
Yes. Customized templates saved to your clinic's account are visible to all users under the same organization. A front desk coordinator and a nurse can both log in and download the same branded handout without any version confusion or duplicate editing.
How long does it take to customize a patient education handout?
Branding alone takes about 20 seconds when your clinic details are saved in settings. Content editing varies by how many sections need input. Most clinics report that a full content and branding customization takes 5 to 10 minutes per template.
Are there customizable patient education handout templates for specific medical specialties?
Yes. ClinicsFlows has 2,000+ templates across 14 specialties, including dental, physical therapy, pediatrics, cardiology, dermatology, and orthopedics. Each specialty page is sorted by procedure and condition type. Browse by specialty at clinicsflows.com/handouts.
One Branded Handout Beats a Folder of Generic Ones
An unbranded patient education handout is a document without an owner. Patients can't connect it to you, can't call you from it, and won't reference it when questions come up.
Start with the procedure your front desk explains most often by phone. Copy that template on ClinicsFlows. Edit the two or three sections that need your clinic's specific input. Save your branding once in settings. Download a PDF that points every question back to you.
Browse 2,000+ free patient education handout templates at ClinicsFlows, organized by specialty and ready to customize with your clinic's content and logo.